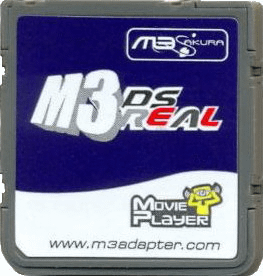
M3 DS Real and M3i Zero (Not GMP-Z003)
m3adapter.com
Cart Info
The M3 DS Real is the second Slot-1 flashcart from the M3 Adapter team. The M3 team disappeared around 2011, and the Sakura kernel hasn't been updated since then. That means some games released later on in the DS lifecycle don't actually boot in the Sakura/Touchpod kernel, due to missing compatibility patches. To fix this issue, it's recommended to either run Pico-Launcher/YSMenu as replacement kernel, or Sakura with YSMenu as fallback, if you choose to keep Sakura as the primary kernel.
While this cart does support SDHC SD cards, Sakura/TouchPod has issues with cards that are 64GB or larger. The nds loader will simply refuse to load games, or load the game but crash/freeze soon after. However, YSMenu and Pico-Launcher handle 64GB and larger cards just fine on the M3 DS Real, when configured as primary kernel.
Setup Guide:
Kernel Info
Pico-Launcher is the game menu for the DSpico (an open source DS flashcart by the LNH team) and other supported carts. Combined with Pico-Loader, it can be used as a full kernel, and supports almost all retail DS games. It features a material-inspired user interface, and an extremely fast loader.
Soft-Reset & RTS Not Supported
Note that Pico-Launcher/Loader currently does not support soft-resetting to the game menu. If this is important to you, consider using YSMenu or Sakura.
RTS is only supported on Sakura, the stock kernel for M3 DS Real.
-
Format the SD card you are using by following the formatting tutorial.
-
Download the latest Pico Package for M3DS Real.
- Currently updated to Pico-Launcher
v1.3.0and Pico-Loaderv1.7.1
- Currently updated to Pico-Launcher
-
Extract the
pico_package_M3DS.zipfile with 7-Zip, or your native file manager app. -
From within the extracted files, copy the following files/folders to your SD card root:
-
_picofolder -
SYSTEMfolder -
_picoboot.nds
-
-
If you'd like to be able to use cheats on your games, download a cheat database.
-
You will need the
usrcheat.datfile from the download link in the post. Copy this file into the_picofolder on your SD card. -
Create a
Gamesfolder in your SD card root, and place any.ndsgame ROMs you'd like to play inside. -
The files on your SD card should now look like this:
-
Insert the SD card back into your cart, plug the cart into your DS, and see if it boots into the menu.

Post-Setup Enhancements
Emulators
To emulate retro consoles like GBA, GB/C, NES, and others, you will need to add emulators and configure their file associations for Pico-Launcher to display retro ROMs in the menu.
Game Covers
Pico-Launcher supports showing game covers in cover flow layout mode, and on the top screen in icons mode. You will need to add cover images to your SD card to use this feature.
PicoCover TwilightBoxart PicoDex
To create your own custom covers for Pico-Launcher, check out the cover creator. Save each cover in the _pico/covers/user folder on your SD card, named after its ROM file plus .bmp (for example, MyGame.nds.bmp).
Themes
Looking to customize your DSpico interface? Check out the Pico themes repository:
To create your own custom themes for Pico-Launcher, check out the themes creator:
Kernel Info
AKMenu-Next is an alternative kernel based on akmenu4 (used in Wood R4 and AKAIO) and uses Pico-Loader (and optionally nds-bootstrap) to load games. This is an option if you prefer the Wood UI and it's themes over Pico-Launcher.
Soft-Reset Not Supported for Pico-Loader
Note that Pico-Loader inside AKMenu-Next currently does not support soft-resetting to the game menu. If this is important to you, consider using YSMenu or using the nds-bootstrap loader within AKMenu-Next.
-
Format the SD card you are using by following the formatting tutorial.
-
Download the latest release of AKMenu-Next Flashcart Edition.
-
Extract the downloaded
akmenu-next-flashcart.zipfile with 7-Zip. -
From within the akmenu-next files, copy the following files/folders to your SD card root:
_ndsfolder_picofolderBOOT.NDS
-
Go into the
Autobootfolder and then go into theM3 DS Real, M3i Zero (non-GMP-Z003), iTouchDS, R4(i) SDHC (r4rts.com)folder. Copy its contents to your SD card root. -
Download the latest release of Pico-Loader for M3DS Real.
-
Extract the downloaded
Pico_Loader_M3DS.zipfile with 7-Zip. -
Copy the contents of the files from the extracted
Pico_Loader_M3DS.zipfile to the_picofolder on your SD card. -
If you'd like to be able to use cheats on your games, download a cheat database.
-
You will need the
usrcheat.datfile from the download link in the post. Copy this file to_nds/akmenunext/cheats/on your SD card. (Create thecheatsfolder if it doesn't exist) -
Create a
Gamesfolder in your SD card root, and place your.ndsgame ROMs inside. You can also create additional folders to help with organizing/categorizing your ROMs. -
Insert the SD card back into your cart, plug the cart into your DS, and see if it boots into the menu.
-
Boot AKMenu-Next, press
STARTand go toSettings. In theGame loader settingstab, changeGame LoadertoPico-Loader, then pressAand confirm to save.
nds-bootstrap installation (Optional)
-
Download the latest release of nds-bootstrap.
-
Extract the downloaded nds-bootstrap.zip file with 7-Zip.
-
Copy the contents of the files from the extracted
nds-bootstrap.zipfile to the_ndsfolder on your SD card. -
In AKMenu-Next, press
Startand go toSettings. Go to theGame Loadertab and change theGame Loadertonds-bootstrap.
Post-Setup Enhancements
Plugins
To emulate retro consoles like GBA, GB/C, NES, and others or to play media such as videos, you will need to add plugins to AKMenu-Next:
Game Covers
AKMenu-Next can show game covers on the top screen. To use them, select one of the included cover themes: Blue Skies Game Covers, DSpico Game Covers or Starlight Covers. Then add cover images to your SD card. Covers made for Pico-Launcher work too.
To create your own custom covers, check out the cover creator. Save each cover in the _nds/covers_name folder on your SD card, named after its ROM file without .nds (for example, MyGame.bmp).
Themes
Looking to customize your AKMenu-Next interface? Check out the AKMenu themes repository:
Kernel Info
TWiLight Menu++ is an alternative kernel that can load DS games with Pico-Loader or nds-bootstrap. It features a Nintendo DSi style interface and it has rich customisation features. It does however take longer to start up compared to other menus such as AKMenu-Next or Pico-Launcher.
Soft-Reset Not Supported for Pico-Loader
Note that Pico-Loader inside TWiLight Menu++ currently does not support soft-resetting to the game menu. If this is important to you, consider using YSMenu or using the nds-bootstrap loader within TWiLight Menu++.
-
Format the SD card you are using by following the formatting tutorial.
-
Download the latest release of TWiLight Menu++ Flashcard Edition.
-
Extract the downloaded
TWiLightMenu-Flashcard.7zfile with 7-Zip. -
From within the TWiLight files, copy the following files/folders to your SD card root:
_ndsfolderromsfolderBOOT.NDS
-
Open the
Autobootfolder, then open theM3 DS Real, M3i Zero (non-GMP-Z003), iTouchDS, R4(i) SDHC (r4rts.com)folder and copy its contents to your SD card root. -
Download the latest release of Pico-Loader for M3DS Real.
-
Extract the downloaded
Pico_Loader_M3DS.zipfile with 7-Zip. -
Create a folder on the SD card root called
_picoif it does not already exist. Copy the.binfiles from the extracted Pico-Loader files into the_picofolder on your SD card root. -
If you'd like to be able to use cheats on your games, download a cheat database.
-
You will need the
usrcheat.datfile from the download link in the post. Copy this file to_nds/TWiLightmenu/extras/on your SD card. -
Place any
.ndsgame ROMs you'd like to play into/roms/ndson your SD card. -
Insert the SD card back into your cart, plug the cart into your DS, and boot into TWiLight Menu++.
-
Open TWiLight Menu++ DS Classic Menu by pressing
SELECTand then pressing the settings icon on the bottom to enter TWiLight Menu++ settings, go to theGames and Apps settingspage, and setGame Loadertopico.
nds-bootstrap (Alternative Game Loader)
If you would prefer to use nds-bootstrap, TWiLight Menu++ includes nds-bootstrap, so no additional files are needed to use it.
-
Open TWiLight Menu++ DS Classic Menu by pressing
SELECTand then pressing the settings icon on the bottom to enter TWiLight Menu++ settings. -
Set
Game Loadertonds-bootstrapto use it for all games. You can also pressYon a selected game and change itsGame Loadersetting to use nds-bootstrap only for that game.
Post-Setup Enhancements
Plugins
While GBA game support is already included in TWiLight Menu++, to emulate retro consoles like GB/C, NES, and others or to play media such as videos, you will need to install addons to TWiLight Menu++:
Game Covers
TWiLight Menu++ supports showing game box art. DS-Homebrew details multiple options to download and install covers for your games.
Themes
Looking to customize your TWiLight Menu++ interface? Check out the DS-Homebrew themes repository:
-
Format the SD card you are using by following the formatting tutorial.
-
Download the RetroGameFan YSMenu 7.06 kernel.
-
Extract the YSMenu .7z file you downloaded using 7-Zip, then go into the
M3Real_M3iZero YSMenufolder. -
From this folder, copy the following files/folders to your SD card root:
-
Gamesfolder -
Systemfolder -
TTMenufolder -
SRESET.DAT -
YSMenu.nds
-
-
Place any .nds game ROMs you'd like to play into the
Gamesfolder. -
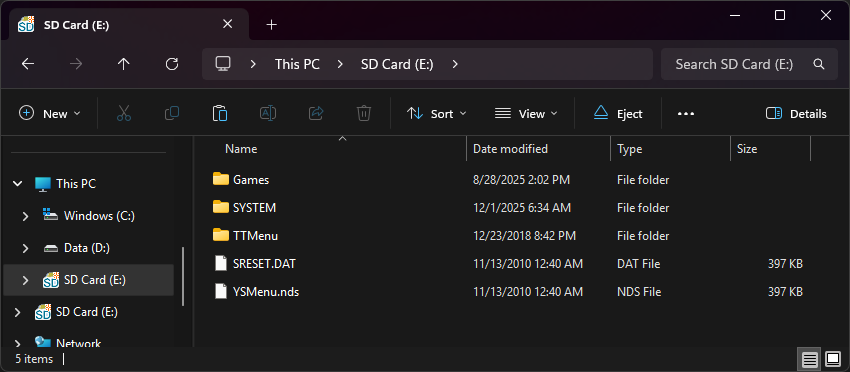
The files on your SD card should now look like this:
-
Insert the SD card back into your cart, plug the cart into your DS, and see if it boots into the menu.
Post-Setup Enhancements
Emulators
To emulate retro consoles on your DS like GBA, GB/C, NES, and others, you will need to download emulators.
Themes
Looking to customize your menu? Check out the YSMenu themes repository:
Sakura Kernel
Sakura is the official kernel of the M3 DS Real and M3i Zero. It's based on Moonshell 2, with a custom NDS loader. It also offers a couple unique features like RTS (Real-Time-Save), not found in YSMenu. Because it's based on Moonshell2, it also provides media playback directly in the kernel menu, which can be pretty convenient. This tab will help you setup Sakura with YSMenu, so that you can use Sakura as primary and fallback to YSMenu when necessary, for games that don't load in Sakura.
-
Format the SD card you are using by following the formatting tutorial.
-
Download the Sakura 1.49a kernel.
-
Extract the contents of the Sakura zip to your SD card's root. (It should just be a single
SYSTEMfolder) -
If you'd like to be able to use cheats on your games, download a cheat database.
-
You will need the
cheat_EN.dbfile from the download link in the post. Copy thecheat_EN.dbfile into theSYSTEMfolder on your SD card. -
Next, we'll be adding YSMenu 7.06 to the setup.
-
Download the RetroGameFan YSMenu 7.06 kernel.
-
Extract the YSMenu .7z file you downloaded using 7-Zip, then go into the
M3Real_M3iZero YSMenufolder. -
From this folder, copy the following files/folders to your SD card root:
-
Gamesfolder -
TTMenufolder -
SRESET.DAT -
YSMenu.nds
-
-
Place any .nds game ROMs you'd like to play into the
Gamesfolder. -
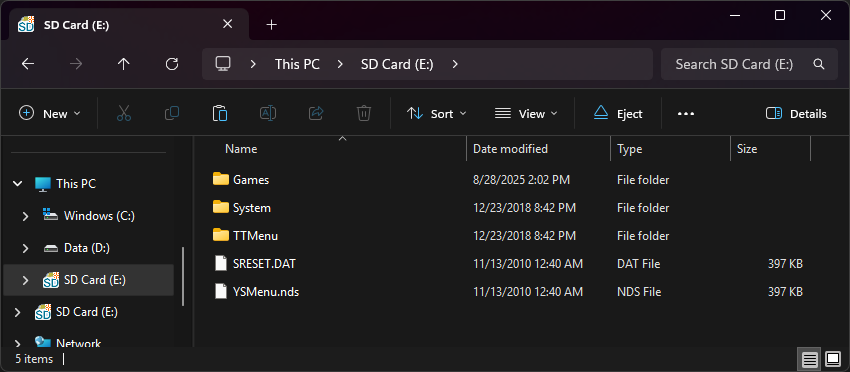
The files on your SD card should now look like this:
-
Place the SD card back into the cartridge, and boot it up. You'll be asked to select between TouchPod or Sakura, choose whichever you prefer. You can change this later. When you want to use YSMenu, simply launch YSMenu.nds in Sakura/Touchpod.